Telegram

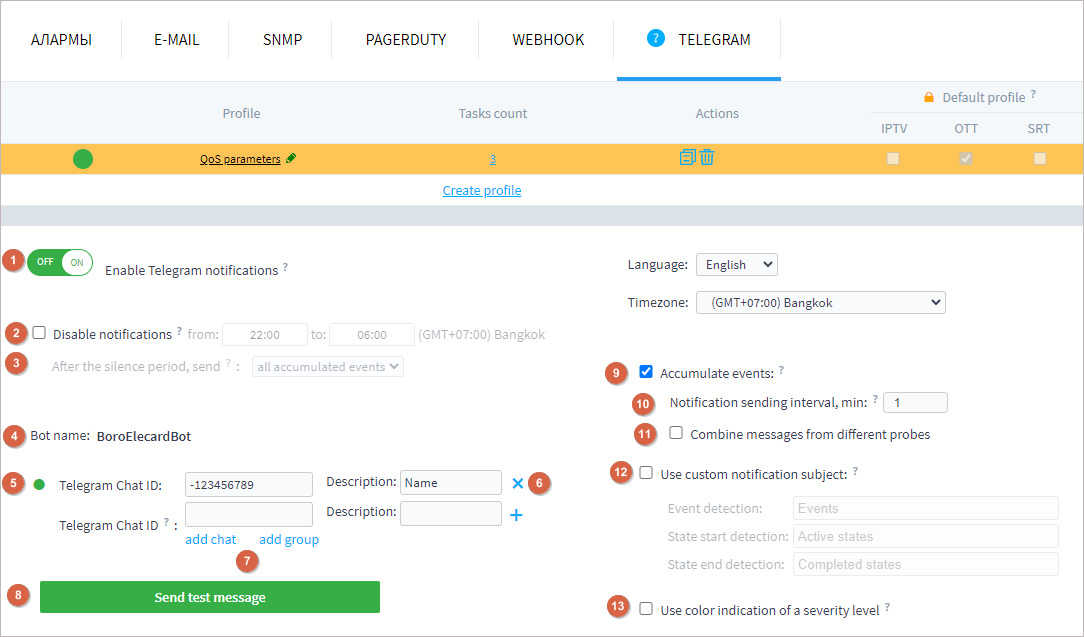
The Telegram chat identifier (5) is used for linking the chat with bot to a profile. You may use automatic linking scenario or manually link the chat to a profile.
Automatic Linking
Attention
Please note you may need to configure proxy or VPN usage for a smooth experience of automatic linking scenario.

The chat indicator turns green if the profile and chat have successfully been linked. The chat indicator displays the notifications status. In case notifications are disabled, the indicator turns red.
Manual Linking
To validate the correctness of specified settings, click the Send test message button (8).
Attention
Bot has no access to group messages except for messages which: @mention the bot’s name; reply to the bot’s own messages; start with a slash “/”.
Configuring Notification Sending
Notifications are sent when a state starts/ends, or when an event occurs. Classification of events and states is given in the Triggers chapter.
Attention
registration of events will start as a notification recipient is specified. The profile remains inactive in following cases:
no recipient specified, or
notifications for all chats/groups are disabled, or
bot was stopped and blocked for all chats/groups.
Sent notifications include the following information:
a project name;
a name of the probe that detects the event;
a task name (URI is sent if a task name is not specified);
for states: a state name; a number of registered states; date of the state, start and end time of the state. For in-process events, the notification includes information about the starting time and state duration registered at the moment of notification sending;
for events: an event name, registration time and date of the event.
Each notification header contains an icon defining the notification type:
 — detection of a state/event;
 — completion of a state;
 — detection of a short-time state completed at the time of the notification sending.
Go to the Telegram notifications profile to configure notifications sending. The following settings are available:
Accumulate events (9) — enables accumulation of notifications during specified interval. The Telegram notification system is capable of accumulating up to 200 events. If the threshold is exceeded, notifications for active states will be sent primarily. When disabled, notifications are sent immediately.
Notification sending interval (10) defines how often notifications are sent within the range of 1-30 minutes. For the first registered event, the notification is sent within a minute, then the interval counting is started and all events registered in this period are accumulated. When the period ends, all accumulated events are grouped into one message and sent to the user. If no events occur during the specified interval, the notification for the first occurring event will be sent within a minute after its detection.
Combine messages from different probes (11) — the setting allows combining notifications for several probes in the same notification. This setting is disabled by default, individual notifications are sent for each probe.
Use custom notification subject (12) — specifying custom subjects for notifications sent when the probe detects an event occurrence or start/end of a state. The custom subject may include no more than 50 characters.
Use color indication of a severity level (13) — add severity level indicator to triggers in Telegram notifications. For triggers of different severity level, the following indicators are possible:
ok — green;
warning — yellow;
error — orange;
major — red;
fatal — black.
You may change a trigger level on the notification profile page.
Add links to event times (14) — times in messages will be displayed as links to the task page positioned based on these times. However, due to limitations on the Telegram message size, this can increase the fragmentation of accumulated messages, which in turn decreases message readability.
Setting the Silence Period
The procedure for configuring the silence period is described on the Notification Profiles page. The Telegram notification system is capable of accumulating and notifying about 200 events. When accumulating, if the threshold is exceeded, notifications for active states will be sent primarily.
Managing Notifications in Chat With the Bot
In order to send a command to a bot, you may use the interactive command list. Open the list, click the / button and select a required command and click it.
Below is a list of commands that can be used in the Telegram chat:
/start— requesting Chat ID, fill the identifier returned in a reply in the Telegram Chat—ID field;/enable— enabling the profile notification. In reply the bot returns a list of profiles for which notifications can be enabled;/disable— disabling the profile notification. In reply the bot returns a list of profiles for which notifications can be disabled;/list— getting a list of profiles linked to the chat and its statuses;/help— opening the commands list.
To disable notifications, disable setting Send notifications to Telegram (1) or send the /disable command in a chat and select a required profile.
Limits for Telegram Notifications
It should be noted that limits are applied when the bot sends notifications to a group in Telegram. If sending frequency is too high, the Telegram system will pause the notification sending for a bot. When sending is paused, Boro starts counting number of notifications that cannot be sent. As soon as the restrictions are removed, you will receive the alarm-message summarizing the number of unsent notifications and the list of linked projects and profiles. To view the details for unsent notifications, go to the Telegram journal. In the journal, these notifications are marked by the red icon ![]() in the Details column.
in the Details column.
We recommend to use chats for continuous receiving of project notifications.
Watch Video
See also