
General Settings
In the section Project Settings ➝ General Settings, you can edit a project name, update an authentication file, configure a project sharing, select a default view, delete a project, or set up SAML authentication.
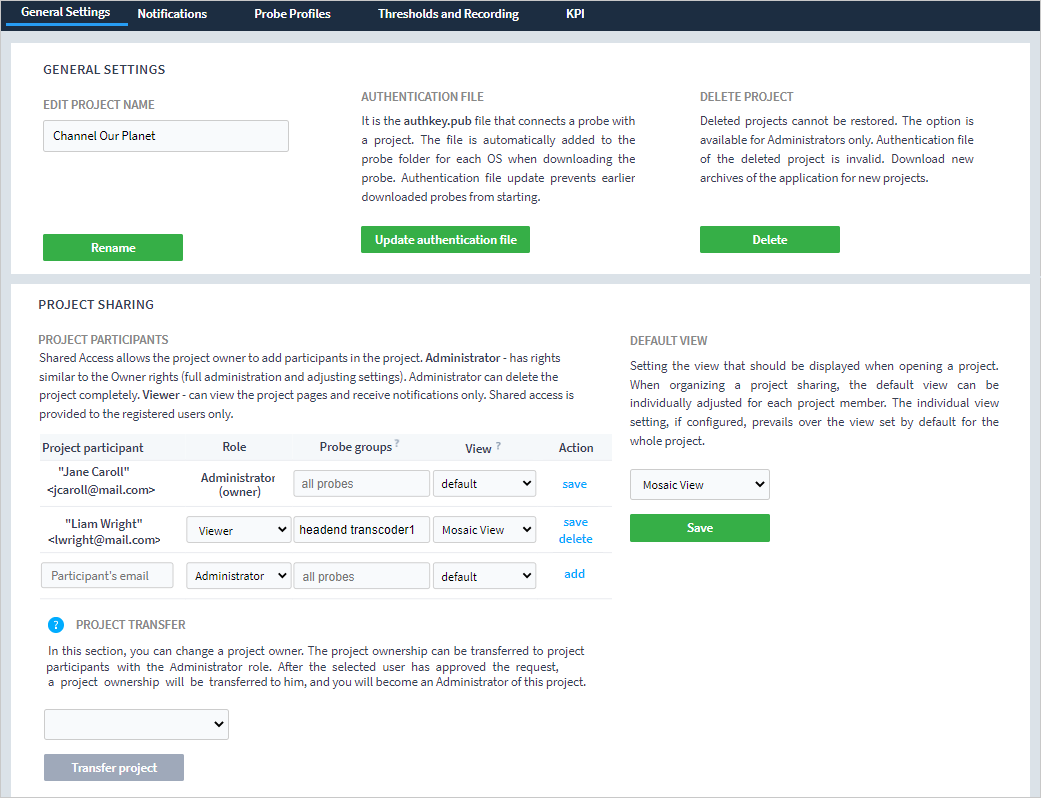
Editing a Project Name
To change a project name, go to the Edit project name section. Specify a new name and click the Rename button.
Authentication File
The authentication file is the authkey.pub file that allows a probe to be associated with a project. The file is automatically added to the probe folder for each OS when the probe is downloaded. Updating the authentication file prevents previously downloaded probes from starting. To update a file, you should:
Click the Update authentication file button. In the confirmation window, click the OK button to proceed with the file update. The download of the updated file will begin.
Stop the probe, copy the authkey.pub file to the probe folder.
Start the probe.
Selecting a Default View
You can select a default view that will open when entering a project. The following system views are available: Block View, Mosaic View, Live View, Table View, Graph View, KPI View, Alarms Journal, or the list of project probes.
To set a view, select a view from the list and click the Save button.
If you set a particular view for a project member, the individual setting overrides the default view set for the whole project.
Project Sharing
Once the project is created, it can be shared 1 with other Boro users. The following project roles exist:
Administrator — role rights are similar to the project Owner rights. The Administrator rights allow downloading and controlling probes, adjusting project settings, adding new analysis task within the limit of a current plan 2. The Administrator has access to all reports created by any user. Furthermore, Administrator can delete himself from the shared project or delete the project completely.
Engineer — role rights imply the ability to manage the project and probes almost completely, except for changing the General Settings of the project. Therefore, the Engineer cannot manage access to the project.
Operator — role rights allow running and controlling probes, but the Operator does not have access to manage any Project Settings.
Viewer — role rights allow viewing the project pages. Changing project settings, downloading probes and controlling them is not allowed. The Viewer has access only to reports generated by him.
Visitor — role rights allow viewing the project views. Access to project settings is denied even for viewing.
In the table below, the distribution of rights between the different roles is defined:
Visitor |
Guest 3 |
Viewer |
Operator |
Engineer |
Administrator |
|
|---|---|---|---|---|---|---|
Access to the operating views |
V |
V |
V |
V |
V |
V |
Access to the Alarm and Event Journals |
V |
V |
V |
V |
V |
V |
Partial access to view settings |
V |
V |
V |
V |
V |
|
Creation and download of reports from the Alarm and Event Journals |
V |
V |
V |
V |
||
Probe download and start |
V |
V |
V |
|||
Update/restart/stop on the probe page. Assigning a system profile to a probe |
V |
V |
V |
|||
Creation/stop/restart of probe tasks. Editing the configuration of already running tasks |
V |
V |
V |
|||
Counter reset in the TableView |
V |
V |
V |
|||
Creation/download/deletion of stream records |
V |
V |
V |
|||
Download of created KPI reports |
V |
V |
V |
|||
Creation/download/deletion of scheduled KPI reports. Deletion of created reports |
V |
V |
||||
Creation/configuration/deletion of any notification, threshold, record, KPI, and system profiles |
V |
V |
||||
Managing settings in the General Settings page: shared access to a project, SAML authentication, project deletion, etc. |
V |
|||||
Clearing the Alarm and Event Journals |
V |
- 1
Only a project Owner or Administrator can control a project sharing.
- 2
The maximum number of mediastreams is limited by the plan set for the project Owner account in the “Plan and Payment” tab.
- 3
There is a role with a separate access category — Guest. This role provides any unregistered user with read-only access to the views (without access to view settings). In the cloud service, the role is used only for the Live Demo. In the Boro Solution, the Administrator can organize read-only access to any project.
Enabling Project Sharing
Note
Project Sharing is provided to the registered users only!
In the Administrator (project Owner) account, go to the project to be shared and open the Project settings ➝ General Settings.
Enter a participant’s e-mail for a project sharing, select the project role, a default view, probe groups, then click Add action.
A confirmation email is sent to a user with a link to a shared project. To view a shared project, open the Projects ➝ All projects or go to My account ➝ My projects.
Note
Collaboration on the shared project does not result in any additional charges to the Owner account. Full access to the shared project is available to the participant’s account, even if his balance is zero.
Disabling Project Sharing
Go to the project to stop a project sharing. Select Project settings ➝ General settings.
Select the account from the Project Participants list and press Delete. As the project sharing is disabled, the project will disappear from the All Projects tab for a user.
Note
A project participant with the Viewer role cannot delete themselves from the project. Only the project Owner and Administrator are authorized to delete a Viewer.
Organizing Partial Project Access
Instead of giving a user access to the whole project, you can use the “Probe Groups” setting to allow access to specific probes. For example, the proposed solution can be used when you need to share access to the common monitoring system between regional teams. The user will only see information for all tasks of the probes they have been given access to. This setting can only be applied to project members with the Viewer role, as the Administrator role implies access to all project probes.
To create a new group, go to the probe page or to the all probes page. You can assign multiple group tags to a probe, this gives you the flexibility in access distribution. After assigning groups to probes, return to the “General settings” page. Select the required tags from the dropdown list in the “Probe Groups” column and save changes.
Note that a user cannot be given access to a specific task. A workaround solution is to run the separate probe for the required users.
Project Transfer
Attention
Before transferring a project, please check that the plan account of the supposed project Owner allows them to start monitoring of all streams. In case the plan is exceeded, some tasks will be stopped.
A project Owner can transfer his project to other Boro user. The required condition is to add a user with the Administrator role to a project (see the Project Sharing section). Once this condition is met, select a user from the dropdown list and click Transfer project. An email will be sent to the user with a link to the transferred project. By clicking the link, the user can accept the project transfer request on the page that opens. Until a request is approved, a project Owner can cancel it. When a user approves a request, they are given access to the full project administration. The previous Owner will remain in the project with the role of Administrator. If a user rejects a request, the project won’t be transferred.
Managing Display Settings
In the Display Settings section, you can enable the display of a task statistics panel for the entire project. The panel appears in the header of all views when you check the Display the project statistics panel box. Then, you need to select metrics that should be displayed in the panel. For MLT and MLS, you also need to set thresholds. A detailed description of metrics can be found in the Parameters, Events and Errors section. If the panel is enabled, but no parameters have been selected for display, the panel shows only the number of active tasks. You can apply probe group filtering to the statistics panel. As a result, it will only display data for selected probes. To apply filtering, check the Apply probe group filtering to the statistics panel box. More information about the panel is available in the State Panel section.
Managing Project Tags
The General Settings page shows a complete list of project tags. To delete a tag in use, click on the cross in the tag area. The Remove unused tags action will delete all tags in the project that are not in use.

Deleting a Project
The option is available for Administrators only. Deleted projects cannot be restored. The authentication file of the deleted project is invalid, so you will need to download new archives of the application for new projects.
SAML Authentication
In this section, you can set up authentication with SAML SSO to access a project without registering a user and entering a password (one of the integration modes requires one-time email validation). To do this, you need to choose the type of account (an individual or proxy account) for signing on and add the metadata of a SAML identity provider. You can view a detailed guide on how to configure SAML authentication on the corresponding page.