SNMP
In the Boro system, SNMP notifications can be sent to the required destination IP address. A decision on notification transfer is taken on the server side in accordance with the pre-configured triggers. Subsequently, the server generates the message body and transmits the message to the probe over the HTTPS protocol. The probe acts as a gateway, it retransmits the server message to the specified trap destination address over the SNMP protocol.
Configuring a SNMP Trap
The probe package downloaded from the personal account contains two MIB files:
The files should be copied to the required location and added to configurations set for the trap management system.
Note
“SnmpAdminString” syntax supporting UTF-8 encoding is used in a MIB file for some fields transfer. UTF-8 has backward compatibility with ASCII code. It means that if ASCII characters are used in names of probes and analyzed channels, the “SnmpAdminString” fields will look like as ASCII strings.
Configuring SNMP Notifications
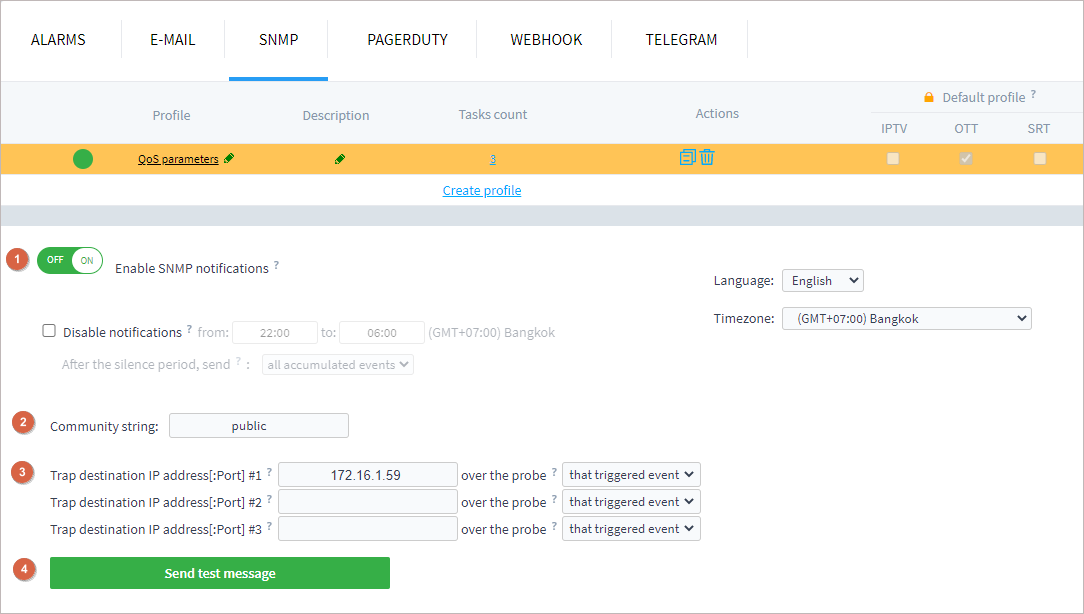
To add a new profile, open the project settings page, go to the Notifications➝SNMP, and click the Create profile.
To enable a profile, check that the setting Enable SNMP notifications (1) is active.
Specify a Community string (2) and set up to three trap destination IP addresses (3). Address should be set in the format IP:[PORT], for example, 10.10.30.235:1234. If the port is not specified, the default port 162 is used.

It is possible to choose a probe acting as the gateway that will send out SNMP trap messages. If the that triggered event option is selected, SNMP trap messages are sent via the triggered probe analyzing the stream. This option is required if the probes are located in different networks with several traps. It is possible to send all SNMP trap messages via the same probe if the probe name is selected from the drop-down box.
Note
The probe should be successfully started at least once, to get the probe name in the drop-down list.
To validate the correctness of specified settings, click the Send test message (4) button.
Setting of silence period is described in the Profile Creation chapter.
Enable and configure the required triggers. The triggers are divided into functional groups. See detailed description of parameters and events in Registered Parameters. After configuring the profile, click the Save button.
Note
It takes up to 1–2 minutes to apply new configurations depending on the number of tasks with the stated profile.
Structure of SNMP Trap Message
There are three types of SNMP trap messages described in the ELECARD-BORO-TRAP-MIB.txt file:
1. State change notification (state in Triggers chapter)
These messages are sent twice: at the start and at the end of an event.
{ sequenceId, referenceNumber, status, probeName, taskName, errorName, level, beginTime, endTime, trapTime }2. Event occurrence notification (event in Triggers chapter)
These messages are sent once when an event is triggered.
{ sequenceId, probeName, taskName, errorName, level, beginTime, endTime, errorsCount, trapTime }3. Server connection loss notification
These messages are sent by the probe that connection with the server has been lost. The message is sent by the probe that has lost connection with the server despite the chosen gateway.
{ sequenceId, referenceNumber, status, probeName, messageError, beginTime, endTime }