
Start and stop
Starting the Probe
Attention
If you plan on running the probe in a virtual machine or in a Docker container, see the Networking on a virtual machine or in Docker section to learn about possible restrictions and recommendations.
Important
To access the full functionality of the monitoring system, a probe should be started with root privileges.
Root privileges (Administrator rights in Windows) are required for following features:
Analyzing the following Ethernet parameters: IAT, MLR/DF, TOS/DSCP, TTL, Src/Dst MAC;
Recording IPTV streams in the Pcap format;
Capturing mirrored packets via sniffer;
Receiving the multicast packets on the ports lower than 1024 (only for Linux OS)
In order to get the application, it is required to register your account and create project (Quick start manual). Having downloaded the archive file with application, please do the following to start the application:
Linux
Copy a downloaded archive file to the required directory in Linux.
Install unzip package if required. For example, for installing unzip package on CentOS 7 run the following command:
sudo yum install unzip.Go to the directory with the archive file and unpack it. Here is the example of a command for extracting files to a particular destination folder:
unzip -d ./boro Boro.2.1.7.2023.05.25.proj1.zip.Open the folder matching your operating system.
Edit the “AppDescription” field in the monitor.cfg file (choose a name for the probe which will be indicated in the system) and use a “proxy” field, removing
//before a proxy server line if required.Run the probe using the console:
sudo ./streamMonitor. The necessity of running the probe with root privileges is described above.In case the probe has been successfully started (the probe is indicated as a colored point in a sidebar of your personal account), all further actions (starting, editing and stopping the task) are performed using browser.
If the probe fails to start, refer to the section A probe won’t start.
Windows
A packet capture library is required for capturing Pcap data. Install the Npcap packet capture library before the probe starts.
While installing the library, WinPcap API-compatible Mode and Support Loopback Traffic options should be selected.
Additionally it is also required to allow streamMonitor.exe to communicate in public and private networks (set two check boxes in the Windows Firewall).
Extract a received archive file to the required directory.
Open the folder matching your OS.
Edit the “AppDescription” field in the monitor.cfg file (choose a name for the probe which will be indicated in the system). It is also possible to use a “proxy” field, removing
//before a proxy server line if necessary.Start the probe as administrator (right-click the streamMonitor.exe file ➝ Run as administrator). A console is supposed to get started.
In case the probe has been successfully started (the probe is indicated as a colored point in a sidebar of your personal account), all further actions (starting, editing and stopping the task) are performed using browser.
If the probe fails to start, refer to the section A probe won’t start.
Stopping the Probe
To stop the probe correctly, press once Ctrl+C on the console and wait (up to 1 min) until the probe’s normal termination. This method is applicable for Linux and Windows OS. If you just close the console, the program termination will be incorrect, since the program will not be able to transmit the Stop command to the server. After the console is incorrectly terminated, the server will be still waiting for the probe’s response within 1 minute, and then all tasks will change their status to “stalled”.
Probe Update
There are two ways for a probe update:
Web-update via the command from the personal account (remote update);
Command in the console (local update).
Important
All settings and tasks are saved during update. However, Elecard recommends to save all configurations at the server or to create a copy of the configuration file (monitor.cfg) before starting update.
Remote Update From Web
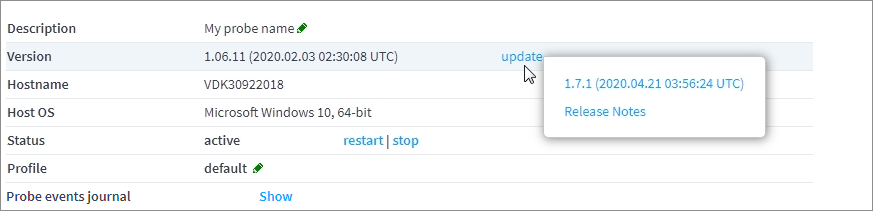
Run the current probe(-s) and go to the probe’s page clicking on the relevant probe name in the side flip. You can see in the picture that there is an update (when hovering over the Update action, the window with available versions to update appear). Click the link.
More information about the update can be found in the section Managing Probe
Update From the Command Line
To update from the command line follow the steps mentioned below:
If the probe is running, stop it by pressing Ctrl+C in the command line. If the probe is running as daemon/service, refer to the question Running and stopping the probe as service.
Go to the directory in the console where the probe is located and run the probe with the -u parameter:
Linux:./streamMonitor -uWindows:streamMonitor.exe -uIf there is an update on the server, the probe will update required components and show the updated version. If update is not available, a message No updates! will be shown in the console.
To check the current probe version, use the parameter “-v “:
[user@localhost lin64]$ ./streamMonitor -v
date changed[pid:20373]: 29.03.2017
Version: 1.01
  Build info: 2017.03.20 08:36:02 UTC
  Platform: lin64