
Probe as Service
Windows Service
The probe can be installed either manually or automatically with script.
Manual installation
Copy the entire contents of the win64 folder from the archive to the target directory. Run the Command Prompt as administrator and go to this directory.
To install the service, run the probe with the
-Roption (enter the service name without a space, e.g. myBoroService):streamMonitor.exe -RmyBoroServiceThe service will be installed.
Open Services Manager
services.mscand find the installed myBoroService, right-click on the service and select Start.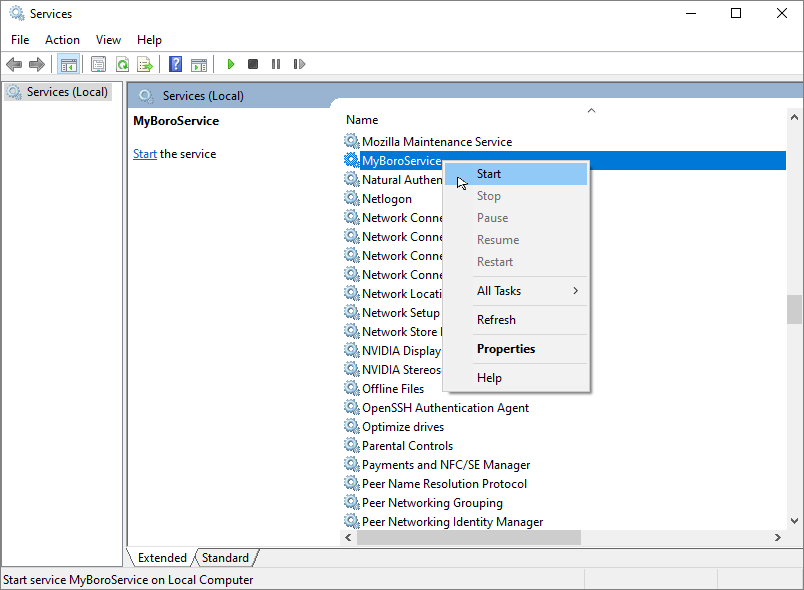
If there are no problems connecting the probe to the server, the service starts, and the “Running” status is displayed in the Properties window.

Note
The service will be installed in automatic startup mode by default. A startup mode can be changed through the Services Manager ➝ Properties window.
To install the second service on the same computer, create a copy of the probe folder. Service names should be unique.
Stopping and uninstalling the service
To stop the service, open the Properties window and click the Stop button. The status will change to “Stopped”.
To uninstall the service, run the probe with the
-Uoption (enter the service name without a space) in the Command Prompt with administrator rights:streamMonitor.exe -UmyBoroService
Installation with script
You can install and run the service automatically with script.
Scripts to work with the probe are located in the folder share/service-daemon of the probe archive.
Before the installation, copy BoroServiceInstall.bat and BoroServiceUninstall.bat scripts to the probe’s folder.
The BoroServiceInstall.bat file successively performs the following actions:
Registers the service with the
Boro_servicename;Creates rules for the firewall to allow inbound and outbound traffic for streamMonitor.exe in any network;
Starts the registered service.
The BoroServiceUninstall.bat file deletes created rules for the firewall, stops and deletes the registered service. To install or delete a service, execute the corresponding script with administrator privileges.
Systemd Service
This is applied to CentOS 7, RHEL 7, Ubuntu 15.10, Fedora 15, and higher versions of mentioned operating systems.
From the probe archive, copy the file
/share/service-daemon/boro-client.serviceto/etc/systemd/system/.Or create the file
/etc/systemd/system/boro-client.servicecontaining the following data:[Unit] Description=Boro probe Documentation=https://boro.elecard.com https://boro.elecard.com/docs/en/UserGuide/index.html After=network-online.target Wants=network-online.target [Service] #Type=simple User=root #Group=root WorkingDirectory=/opt/elecard/boro/lin64 ExecStartPre=-!/usr/bin/chcon -t bin_t streamMonitor ExecStart=/opt/elecard/boro/lin64/streamMonitor PrivateTmp=false Restart=always RestartSec=120s [Install] WantedBy=multi-user.target
Fill in the WorkingDirectory and ExecStart fields correctly to specify the directory of the probe location and path to the executable file, respectively.
To check the service state, execute the command:
systemctl -l status boro-client[user@localhost ~]$ systemctl -l status boro-client boro-client.service - boro client Loaded: loaded (/etc/systemd/system/boro-client.service; disabled; vendor preset: disabled) Active: inactive (dead)
Highlighted fields indicate that autorun is disabled and the application is not started.
To start daemon, execute the command:
systemctl start boro-clientTo stop daemon, execute the command:
systemctl stop boro-clientTo enable autorun execute the command:
systemctl enable boro-clientTo disable autorun execute the command:
systemctl disable boro-clientNote
After Linux reboot, daemon restarts if daemon autorun is enabled.
Check the state of running daemon:
[user@localhost lin64]$ systemctl -l status boro-client
boro-client.service - boro client
Loaded: loaded (/etc/systemd/system/boro-client.service; enabled; vendor preset: disabled)
Active: active (running) since Tue 2017-03-28 16:01:35 +07; 2s ago
Highlighted fields indicate that autorun is enabled (enabled) and the application is running now (Active: active (running)).
SysV Service
This is applied to out-of-date Linux distributions.
Be advised that this init system is saved in modern distributions as legacy. Also, start script functions (/etc/rc.d/init.d/functions) can have different parameters depending on the distribution. For the script revision, see documents covering service initialization of your distribution.
This section describes how to create init script for the Linux CentOS 6.8 distribution. Documents for the script preparation are located in the operating system documentation: /usr/share/doc/initscripts-*/sysvinitfiles.
Go to the directory
/etc/rc.d/init.dCopy from the probe archive the following file (root privileges are required):
/share/service-daemon/boro-client.Or create the boro-client file (root privileges are required) containing the script described below. While creating the script in Windows (CRLF), pay attention to Linux line break style (LF only) which is explicitly required by the bash interpreter.
#!/bin/sh
# chkconfig: - 98 02
# description: OTT and multicast probe.
# processname: BoroProbe

# Source function library.
if [ -f /etc/init.d/functions ] ; then
    . /etc/init.d/functions
elif [ -f /etc/rc.d/init.d/functions ] ; then
    . /etc/rc.d/init.d/functions
else
    exit 0
fi
KIND="Boro-probe"
PROCPATH="/opt/boro/lin64"

start() {
  echo -n $"Starting $KIND services: "
  daemon --check=streamMonitor $PROCPATH/streamMonitor >/dev/null 2>&1 &
  #daemon --check=streamMonitor $PROCPATH/streamMonitor >$PROCPATH/proclog.log 2>&1 &
  echo
}

stop() {
    echo -n $"Shutting down $KIND services: "
    killproc streamMonitor
    echo
}

restart() {
    echo -n $"Restarting $KIND services: "
        stop
        start
}

case "$1" in
    start)
        start
        ;;
    stop)
        stop
        ;;
    restart)
        restart
        ;;
    status)
        status streamMonitor
        ;;
    *)
        echo $"Usage: $0 {start|stop|restart|status}"
        exit 1
esac
exit $?
Set the PROCPATH variable in the script correctly. It is the path to the probe’s catalogue.
Process log can be saved to a file or discarded. Log is discarded:
daemon --check=streamMonitor $PROCPATH/streamMonitor >/dev/null 2>&1 &
#daemon --check=streamMonitor $PROCPATH/streamMonitor >$PROCPATH/proclog.log 2>&1
Log is saved in the proclog.log file in the probe’s folder:
#daemon --check=streamMonitor $PROCPATH/streamMonitor >/dev/null 2>&1 &
daemon --check=streamMonitor $PROCPATH/streamMonitor >$PROCPATH/proclog.log 2>&1
Save changes in the boro-client file.
Change the script access permissions (root privileges are required):
chmod 755 /etc/rc.d/init.d/boro-clientAdd the script to the init system:
chkconfig --add boro-clientAdd the service to startup:
chkconfig boro-client onThe probe automatically runs as service after OS rebooting. To check the service status, start and stop it manually, execute the following commands from the directory:
/etc/rc.d/init.d:./boro-client status ./boro-client start ./boro-client stop
To display a list of system services and view their statuses, execute the command:
chkconfig --list.To switch off the service automatic startup, execute the command:
chkconfig boro-client off.