
5.2. Access and Authentication
5.2.1. User Access Control
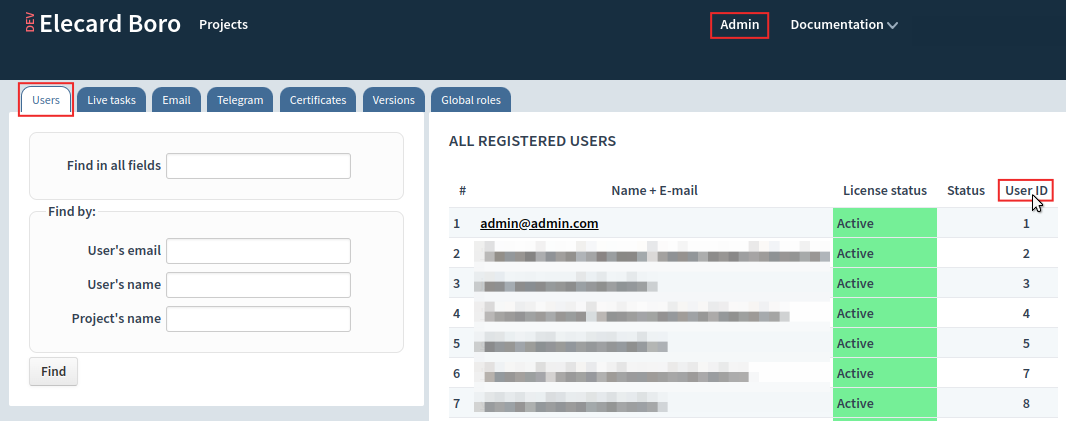
Each time when sending request via API, a user_id is used in request body. It represents a user identifier. To view a list of identifiers, login to the server administrator account (the Superadmin role) and go to Admin ➝ Users:
Access via API is distributed in accordance with the undermentioned principles, and it repeats the access distribution in web interface:
A project owner has administrator rights.
Other users can be added to the project with rights for controlling or just viewing a project (see Project Sharing chapter in Boro UG).
If a user doesn’t have access to a project, then its user_id won’t have access to a project via API either.
When working via API, user_id of Superadmin and Superviser users have the same rights as when working through the interface.
5.2.2. Signing API Requests
Authentication
To authenticate a user in time of request, HMAC-SHA2 algorithm is used. The algorithm leverages stable mechanisms, though it remains an easy solution for implementing on a client side.
Each user generates its own API key for controlling the server via API. The key is used when creating a digital signature for a HTTP request. The signature is generated on the basis of a data set (message payload, date, etc.) and provides unambiguous authentication of a user sending a request. Besides of that, the algorithm allows sending requests via the unencrypted HTTP protocol, since any modifications to message payload will make it inconsistent. Signature will expire in one minute to prevent replay attacks.
Enabling Message Authentication
Important
It is required to specify a Host Name on the Email tab. System cannot apply API settings without this.
To enable user authentication for API, login to the server administrator account (the Superadmin role). Go to the server configuration tab Admin ➝ Control API and enable setting Verify HMAC signatures.

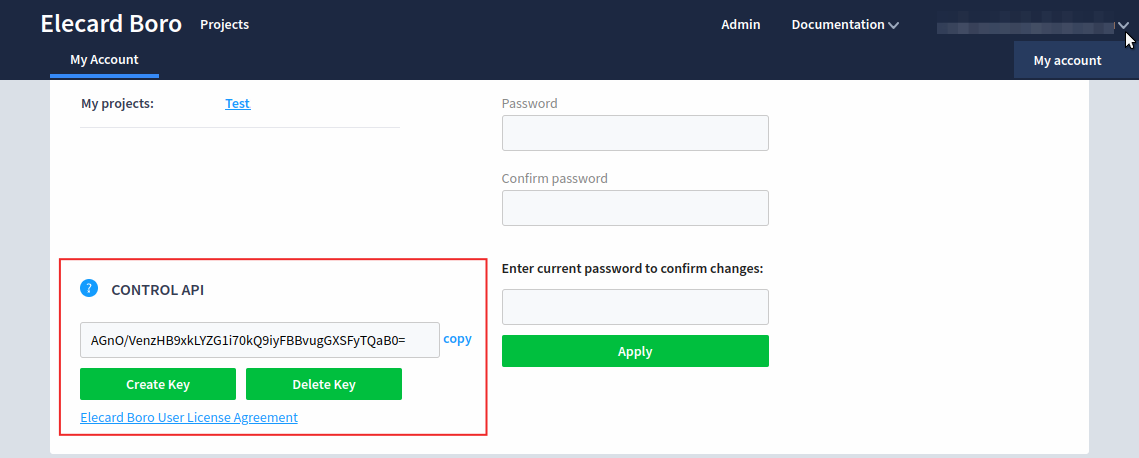
Then each user should generate its own key for controlling the server via API. Click the user name in the upper rightmost corner and select My account from the dropdown list. In the section Control API, click the Create key button. If you think the private key has been compromised, you can delete the key and generate a new one.
References
How It Works
The solution for user authentication is based on the ApiAuth library, written in Ruby language. If your client is written in Ruby, you can use the forementioned library.
In this manual, you can find a code sample based on Python language. The code is designed for describing the basic principles of signature generation. To create a signature, follow the steps below:
Register time and date of a request creation in the format
DAY, DD MON YYYY hh:mm:ss GMTin accordance with RFC 1123.Important
Signature will expire in one minute for preventing replay attacks. It is necessary to make sure that the time is synchronized on the Elecard Boro Server and on the computer from which requests are made for API control. In case time is inconsistent, the signature verification error occurs. The optimal solution is using an NTP server on both computers.
Calculate the value for the
X-Authorization-Content-SHA256header. This is the Base64-encoded result of SHA-256 hash function generated from the payload of the HTTP request. In the code example, therequest_parametersvariable contains the request payload. Foruser_id = '625721355', the result should be the following:x_authorization_content_sha256 = 'OniJqRAkzQHN8KgmAZm/yT5dP94m8CmVVaSTRVg/ptQ='
Create a canonical string. The string contains a strict order of values for the following headers separated by comma:
Request Method,Content-Type,X-Authorization-Content-SHA256,Request URIandDate. Please note thatRequest URIshould contain only a path, not the entire URI. The canonical string example is given below:canonical_string = 'POST,application/json,OniJqRAkzQHN8KgmAZm/yT5dP94m8CmVVaSTRVg/ptQ=,/ctrl_api/v1/json,Thu, 25 Aug 2022 04:27:52 GMT'
Calculate a message authentication code (signature). This is the Base64-encoded result of SHA-256 HMAC hash function, generated from a canonical string with the use of a user API key. The user API key is provided in the Base64 format that requires prior conversion into the Bytes Objects format. For
secret_key = 'AGnO/VenzHB9xkLYZG1i70kQ9iyFBBvugGXSFyTQaB0=', the signature value should be the following:signature = 'vPI9MMRwBZLWNrCcnLnbJjZRna0+XP7yFMhc9KMUFdw='
Add a signature to a HTTP request. You should check that you include all the headers that were used for generation of a canonical string (order is insignificant). Please note that a signature is transmitted in the
Authorizationheader in the following format:'APIAuth-HMAC-SHA256 ' + user_id + ':' + signature. An example of header value:authorization_header = 'APIAuth-HMAC-SHA256 625721355:vPI9MMRwBZLWNrCcnLnbJjZRna0+XP7yFMhc9KMUFdw='
Send a HTTP request.
How to Run a Code Example on Python
You should install Python 3. When starting a script, the system may inform that some packets are missing. Install necessary packets using pip.
Create a file with .py extension and insert there the content from the code example. In the script body, specify the correct field values: server address
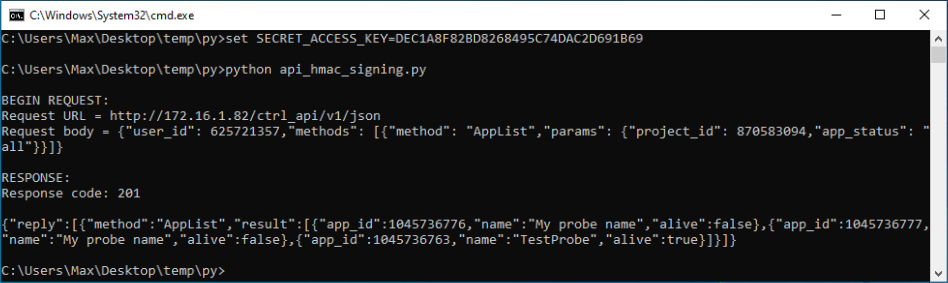
request_host, user IDuser_id, project IDproject_id.Open the command prompt and set your API key as an environment variable:
Windows
set SECRET_ACCESS_KEY=AGnO/VenzHB9xkLYZG1i70kQ9iyFBBvugGXSFyTQaB0=
Linux
export SECRET_ACCESS_KEY=AGnO/VenzHB9xkLYZG1i70kQ9iyFBBvugGXSFyTQaB0=
In the same command prompt window, go to the script file and run it:
python api_hmac_signing.py
The result of successful verification is presented below:
Python Code Example
#!/usr/bin/env python3

# © Copyright 2000-2024 Elecard: Video Compression Guru. All Rights Reserved.
#
# Licensed under the Apache License, Version 2.0 (the "License");
# you may not use this file except in compliance with the License.
# You may obtain a copy of the License at
#
# https://www.apache.org/licenses/LICENSE-2.0
#
# Unless required by applicable law or agreed to in writing, software
# distributed under the License is distributed on an "AS IS" BASIS,
# WITHOUT WARRANTIES OR CONDITIONS OF ANY KIND, either express or implied.
# See the License for the specific language governing permissions and
# limitations under the License.

# The initial release of this source code was created by Amazon.com, Inc. or its affiliates on 2010-2019.
# Copyright 2010-2019 Amazon.com, Inc. or its affiliates. All Rights Reserved.

# Elecard Boro Solution
# API request signing example

# See: https://boro.elecard.com/docs/en/boro-solution-userguide/chapter.ControlAPI/Signing.Requests.html
# This version makes a POST request and passes request parameters
# in the body (payload) of the request. Auth information is passed in
# the Authorization header.

import base64
import hashlib
import hmac
import json
import os
import sys
import requests  # pip install requests

# To get a date in RFC 1123 Date Representation
from wsgiref.handlers import format_date_time
from datetime import datetime
from time import mktime

# ************* REQUEST VALUES *************
http_method = 'POST'
content_type = 'application/json'
request_host = '172.16.1.82'
request_path = '/ctrl_api/v1/json'

user_id: int = 1
project_id: int = 1

# "AppList" request body passed in a JSON block.
body = {
    "user_id": user_id,
    "methods": [
        {
            "method": "AppList",
            "params": {
                "project_id": project_id,
                "app_status": "all"
            }
        }
    ]
}

request_parameters = json.dumps(body)


# Best practice is NOT to embed credentials in a code.
# Get API key value from an environment variable
secret_key = os.environ.get('SECRET_ACCESS_KEY')
if secret_key is None:
    print('No API key is available.')
    sys.exit()


# ************* CREATE THE STRING TO SIGN *************
# Create a date in RFC 1123 Date Representation ('Fri, 05 Aug 2022 03:09:30 GMT') format for headers and the credential string
now = datetime.now()
timestamp = format_date_time(mktime(now.timetuple()))

# Calculate payload (body of the request) hash.
# X-Authorization-Content-SHA256 header is the Base64-encoded SHA-256 hash value used to generate the signature base string.
# This header should be provided by the client, to ensure the request body it sent was not tampered with on its way to the server.
payload_hash = hashlib.sha256(request_parameters.encode('utf-8')).digest()
payload_hash_base64 = base64.b64encode(payload_hash)
x_authorization_content_sha256 = payload_hash_base64.decode('utf-8')

# A canonical string is created using your HTTP headers containing the content-type,
# X-Authorization-Content-SHA256, request path and the date/time stamp.
# This string is then used to create the signature.
canonical_string = http_method + ',' + content_type + ',' + x_authorization_content_sha256 + ',' + request_path + ',' + timestamp


# ************* CALCULATE THE SIGNATURE *************
# Calculate the signature which is a Base64 encoded SHA256 HMAC, using the client's Base64 encoded private API key.
signature_hash = hmac.new(base64.b64decode(secret_key), canonical_string.encode('utf-8'), hashlib.sha256).digest()
signature_hash_base64 = base64.b64encode(signature_hash)
signature = signature_hash_base64.decode('utf-8')


# ************* ADD SIGNING INFORMATION TO THE REQUEST *************
# Put the signature to the Authorization HTTP header in the form: Authorization = APIAuth-HMAC-SHA256 "user_id:signature"
authorization_header = 'APIAuth-HMAC-SHA256 ' + str(user_id) + ':' + signature

# Prepare the necessary headers to be passed in the HTTP request. Order here is not significant.
headers = {'Content-Type': content_type,
           'Date': timestamp,
           'X-Authorization-Content-SHA256': x_authorization_content_sha256,
           'Authorization': authorization_header}


# ************* SEND THE REQUEST *************
request_uri = 'http://' + request_host + request_path

print('\nBEGIN REQUEST:')
print('Request URL = ' + request_uri)
print('Request body = ' + request_parameters)

r = requests.post(request_uri, data=request_parameters, headers=headers)

print('\nRESPONSE:')
print('Response code: %d\n' % r.status_code)
print(r.json())